Providing Virtual Expensya Cards to Employees
To start issuing Expensya cards, the tenant should have already completed the payment onboarding process. For more details: Expensya cards - Account management
As administrator with the payment role Can manage cards can issue and assign virtual Expensya cards to employees. For more details: Expensya Cards - Administrator Role Management
You can choose one of the following options:
Option 1: Assign a virtual Expensya card to an employee
To assign a virtual Expensya card to an employee, follow these steps:
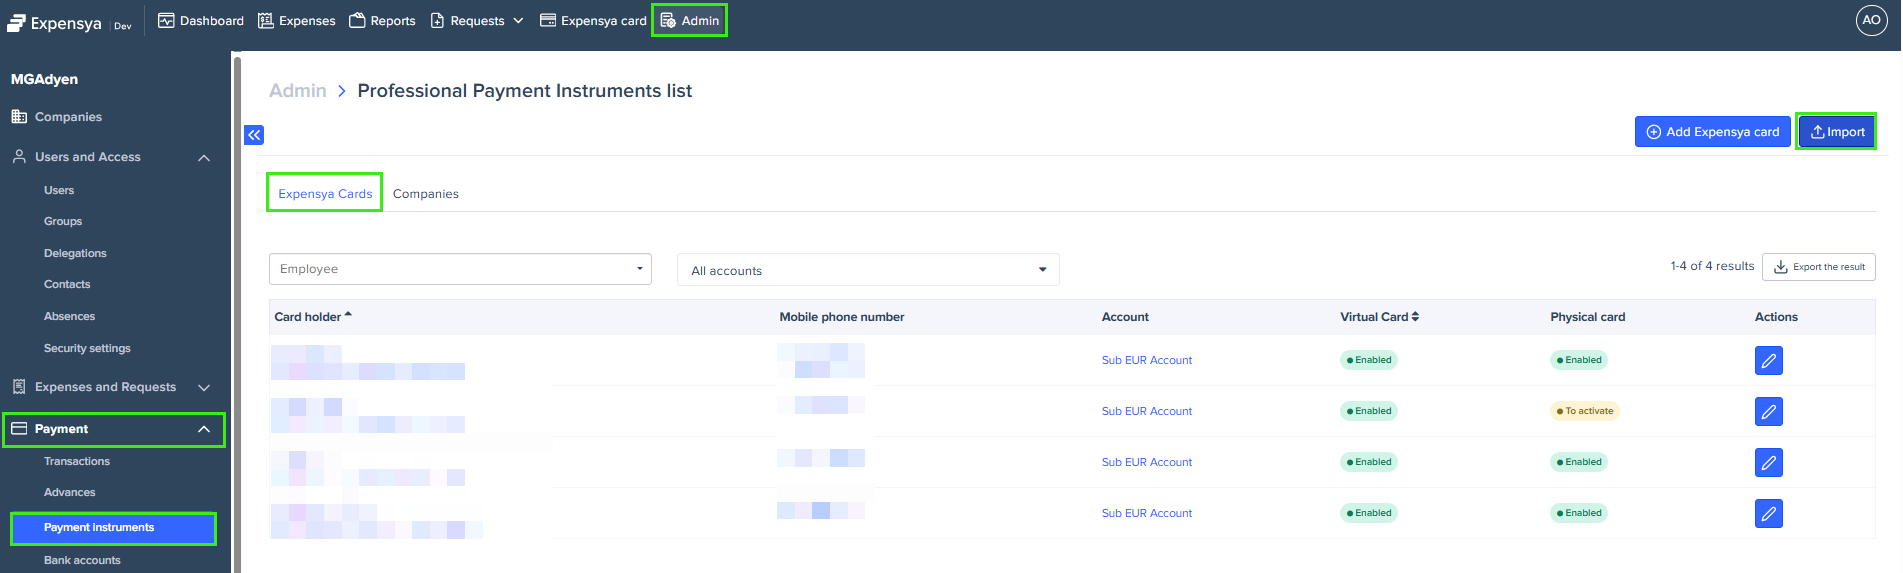
- Go to the Payment Instruments section in the Payment menu.
- Open the Expensya cards tab to view the list of available cards.
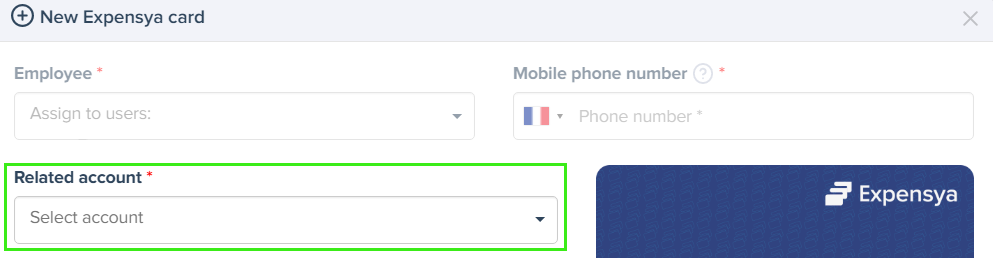
- Click Add Expensya card, then enter the following information:
- Employee name
- Employee phone number

- Select the account that will be debited when the card is used. If your company has multiple accounts, select one. If there is only one account, it is selected by default.
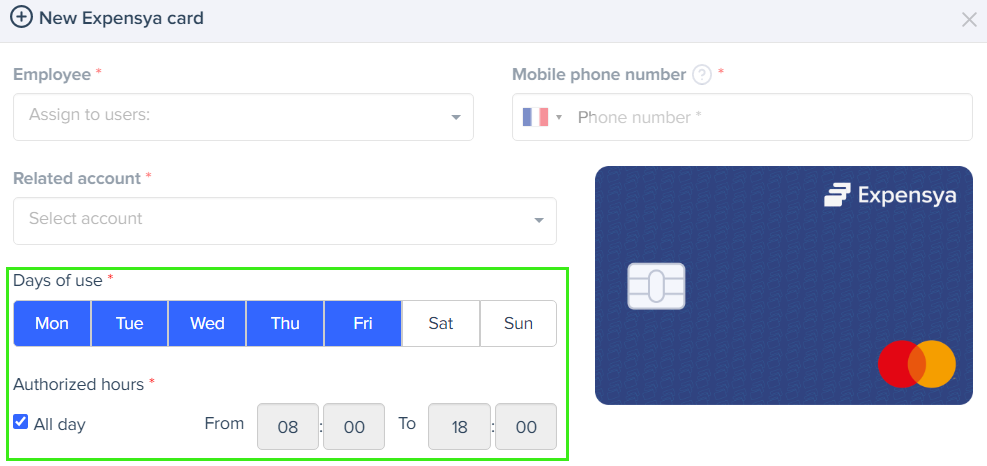
- Set the allowed days and hours for card use.
By default, the card is available Monday to Friday, from 08:00 to 18:00.
- If your card provider is Swan, you can set card payment limits.
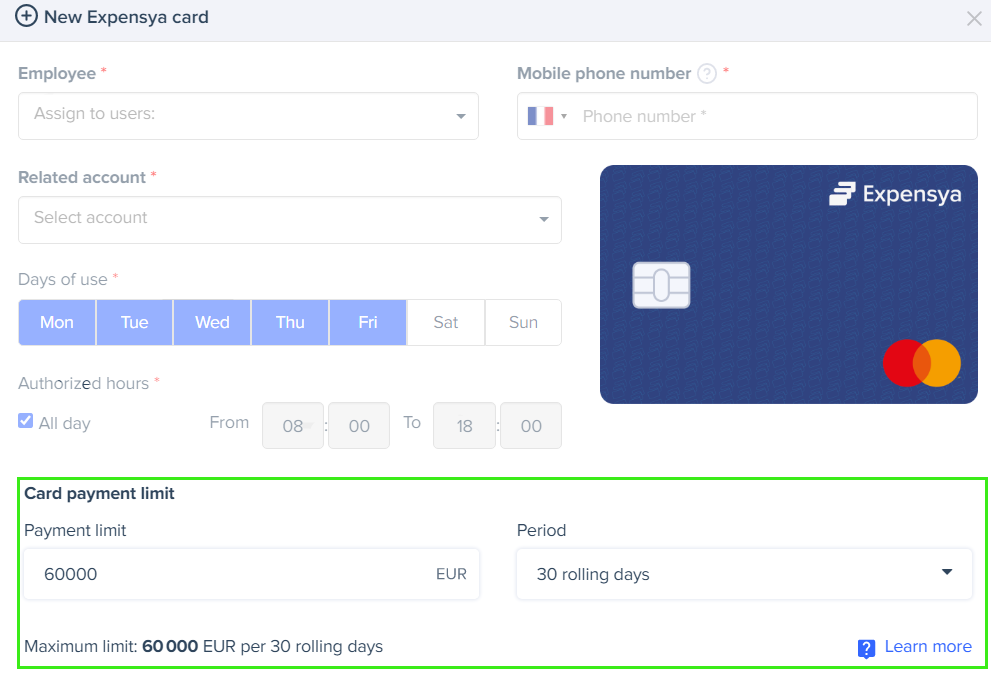
The payment limit of the Expensya card defines the maximum amount allowed for transactions made with the card. This limit is set by the card provider or account administrator and determines the maximum total amount the cardholder can spend during a given period of time. By default, it may be set to a fixed amount over a 30-day rolling period.
Budgets and payment limits serve different purposes. A budget is a specific spending allocation set by the account administrator or requested by the cardholder. It helps monitor and control expenses within a defined context. A budget represents the amount available to spend, while the payment limit defines the absolute maximum allowed for expenses on a card over a fixed period, regardless of the approved budget.
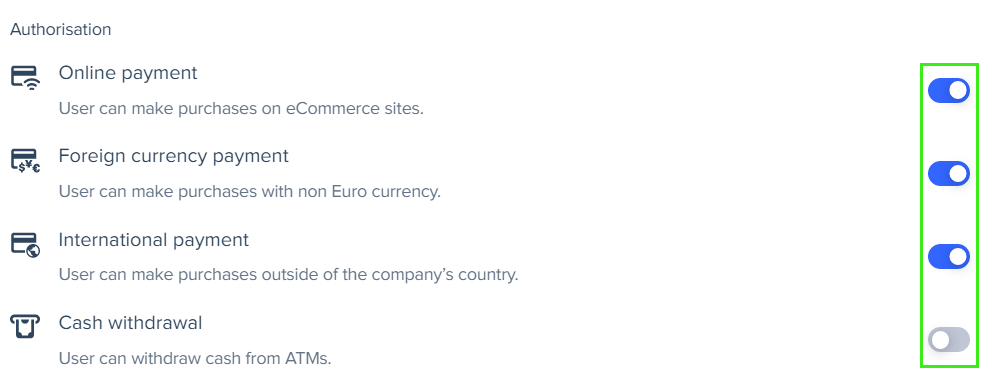
- Select the authorized transaction types (Online payment, Foreign currency payment, International payment, and Cash withdrawal).
The first three options are enabled by default, and Cash withdrawal is disabled.
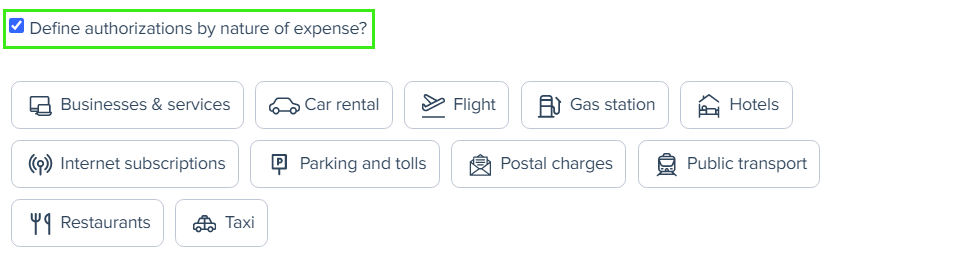
- Select Define authorizations by nature of expense to specify the authorized expense categories (Business and services, Car rental, Flight, Gas station, Hotels, Internet subscriptions, Parking and tolls, Postal charges, Public transport, Restaurants, Taxi).
By default, all categories are allowed.
- Select Define accounting settings to add accounting details.

- Click Add to issue the card to the employee.
If your card provider is Swan, and you are an admin with the authorized payment role, you must confirm the card creation through SMS authentication.
- The newly added card appears in the Expensya cards list under the Expensya cards tab with Invitation Sent status.
- The employee will receive an email invitation to accept the Expensya card.
Option 2: Add multiple virtual Expensya cards in bulk
To add multiple virtual Expensya cards in bulk, follow these steps:
- Go to the Payment Instruments section in the Payment menu.
- Open the Expensya cards tab.
- Click Import, then click Download template file to get the CSV template.
You can add up to 500 Expensya cards in one file.
- Fill in the following data for each row in the file:

- LastName - the employee's last name.
- FirstName - the employee's first name.
- Mail - the employee's email address (format: xxx@xxx.xxx).
- Phone - the employee's mobile phone number (format: country code+number. For example: +33607070707).
- AllDays - to specify when payments with the Expensya card are allowed during the week.
- Enter 1 to allow payments every day. Leave the daily fields empty.
- To allow payments only on specific days, leave AllDays blank and fill in the fields for those days.
- Monday - enter 1 to authorize payments, 0 to block payments, or leave empty if AllDays is set to 1.
- Tuesday - enter 1 to authorize payments, 0 to block payments, or leave empty if AllDays is set to 1.
- Wednesday - enter 1 to authorize payments, 0 to block payments, or leave empty if AllDays is set to 1.
- Thursday - enter 1 to authorize payments, 0 to block payments, or leave empty if AllDays is set to 1.
- Friday - enter 1 to authorize payments, 0 to block payments, or leave empty if AllDays is set to 1.
- Saturday - enter 1 to authorize payments, 0 to block payments, or leave empty if AllDays is set to 1.
- Sunday - enter 1 to authorize payments, 0 to block payments, or leave empty if AllDays is set to 1.
- AllHours - to specify if payments are allowed at any time during the day.
- Enter 1 to authorize payments for all hours.
- Leave it empty if you define specific hours in StartHour and EndHour.
If AllHours is set to 1, leave StartHour and EndHour empty. - StartHour - enter the time in HH:MM format, where HH is from 00 to 23 and MM is from 00 to 59.
- EndHour - enter the time in HH:MM format, where HH is from 00 to 23 and MM is from 00 to 59.
- Authorizations - to specify the allowed expense categories. Enter "All" to authorize all types, or list specific categories separated by commas. Available options: Business and services, Car rental, Flight, Gas station, Hotels, Internet subscriptions, Parking and tolls, Postal charges, Public transport, Restaurants, and Taxi.
- AccountName - enter the exact account name. This field is mandatory.
To add cards to an existing account, you must have the Manage cards role enabled for that account.
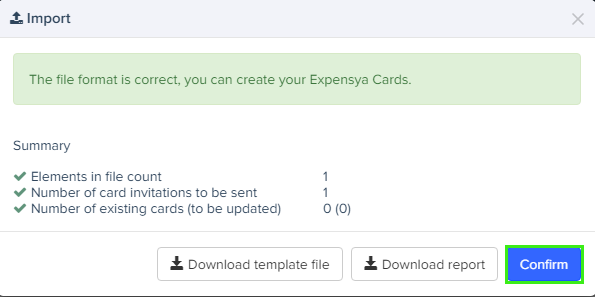
- Import the CSV file, then click Confirm.
- A summary showing the number of card invitations to send appears. Click Confirm again to proceed.
If your card provider is Swan, and you are an admin with the authorized payment role, you must confirm the creation of Expensya cards through SMS authentication.
- The newly added cards appear in the Expensya Cards tab with the Invitation sent status.
- Each employee receives an Expensya Card invitation email for their assigned card.
Once a virtual card is created for an employee, the admin can request a physical card. For more details, seerequest a physical card. For more details, see How to request a physical Expensya card for an employee ?